Element.WithContext
elm-ui-with-context specific functions
Use a property from the context to build an Attribute. Have a look at the README for examples.
Use a property from the context to build a Decoration. Have a look at the README for examples.
This is your top level node where you can turn Element into Html.
Embed an element from the original elm-ui library. This is useful for interop with existing code, like lemol/ant-design-icons-elm-ui.
Embed an attribute from the original elm-ui library. This is useful for interop with existing code.
Embed an attribute from the original elm-ui library. This is useful for interop with existing code.
Basic Elements
The basic building block of your layout.
howdy : Element context msg
howdy =
Element.el [] (Element.text "Howdy!")When you want to render exactly nothing.
Create some plain text.
text "Hello, you stylish developer!"Note text does not wrap by default. In order to get text to wrap, check out paragraph!
The basic building block of your layout.
You can think of an el as a div, but it can only have one child.
If you want multiple children, you'll need to use something like row or column
import Element.WithContext as Element exposing (Element, rgb)
import Element.WithContext.Background as Background
import Element.WithContext.Border as Border


myElement : Element context msg
myElement =
    Element.el
        [ Background.color (rgb 0 0.5 0)
        , Border.color (rgb 0 0.7 0)
        ]
        (Element.text "You've made a stylish element!")
Rows and Columns
When we want more than one child on an element, we want to be specific about how they will be laid out.
So, the common ways to do that would be row and column.
Same as row, but will wrap if it takes up too much horizontal space.
Text Layout
Text layout needs some specific considerations.
A paragraph will layout all children as wrapped, inline elements.
import Element exposing (el, paragraph, text)
import Element.Font as Font


view =
    paragraph []
        [ text "lots of text ...."
        , el [ Font.bold ] (text "this is bold")
        , text "lots of text ...."
        ]
This is really useful when you want to markup text by having some parts be bold, or some be links, or whatever you so desire.
Also, if a child element has alignLeft or alignRight, then it will be moved to that side and the text will flow around it, (ah yes, float behavior).
This makes it particularly easy to do something like a dropped capital.
import Element exposing (alignLeft, el, padding, paragraph, text)
import Element.Font as Font


view =
    paragraph []
        [ el
            [ alignLeft
            , padding 5
            ]
            (text "S")
        , text "o much text ...."
        ]
Which will look something like

Note spacing on a paragraph will set the pixel spacing between lines.
Now that we have a paragraph, we need some way to attach a bunch of paragraph's together.
To do that we can use a textColumn.
The main difference between a column and a textColumn is that textColumn will flow the text around elements that have alignRight or alignLeft, just like we just saw with paragraph.
In the following example, we have a textColumn where one child has alignLeft.
Element.textColumn [ spacing 10, padding 10 ]
    [ paragraph [] [ text "lots of text ...." ]
    , el [ alignLeft ] none
    , paragraph [] [ text "lots of text ...." ]
    ]
Which will result in something like:

Data Table
Show some tabular data.
Start with a list of records and specify how each column should be rendered.
So, if we have a list of persons:
type alias Person =
    { firstName : String
    , lastName : String
    }


persons : List Person
persons =
    [ { firstName = "David"
      , lastName = "Bowie"
      }
    , { firstName = "Florence"
      , lastName = "Welch"
      }
    ]
We could render it using
Element.table []
    { data = persons
    , columns =
        [ { header = Element.text "First Name"
          , width = fill
          , view =
                \person ->
                    Element.text person.firstName
          }
        , { header = Element.text "Last Name"
          , width = fill
          , view =
                \person ->
                    Element.text person.lastName
          }
        ]
    }
Note: Sometimes you might not have a list of records directly in your model. In this case it can be really nice to write a function that transforms some part of your model into a list of records before feeding it into Element.table.
Same as Element.table except the view for each column will also receive the row index as well as the record.
Size
An attribute that can be attached to an Element
Shrink an element to fit its contents.
Fill the available space. The available space will be split evenly between elements that have width fill.
Sometimes you may not want to split available space evenly. In this case you can use fillPortion to define which elements should have what portion of the available space.
So, two elements, one with width (fillPortion 2) and one with width (fillPortion 3). The first would get 2 portions of the available space, while the second would get 3.
Also: fill == fillPortion 1
Add a maximum to a length.
el
    [ height
        (fill
            |> maximum 300
        )
    ]
(text "I will stop at 300px")Similarly you can set a minimum boundary.
 el
    [ height
        (fill
            |> maximum 300
            |> minimum 30
        )


    ]
    (text "I will stop at 300px")
Debugging
Highlight the borders of an element and it's children below. This can really help if you're running into some issue with your layout!
Note This attribute needs to be handed Debug.todo in order to work, even though it won't do anything with it. This is a safety measure so you don't accidently ship code with explain in it, as Elm won't compile with --optimize if you still have a Debug statement in your code.
el
    [ Element.explain Debug.todo
    ]
    (text "Help, I'm being debugged!")
Padding and Spacing
There's no concept of margin in elm-ui, instead we have padding and spacing.
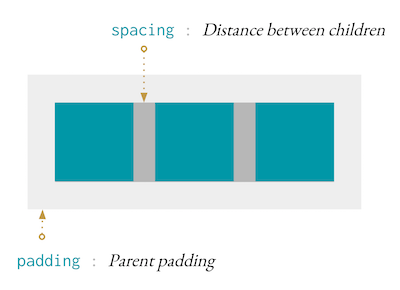
Padding is the distance between the outer edge and the content, and spacing is the space between children.
So, if we have the following row, with some padding and spacing.
Element.row [ padding 10, spacing 7 ]
    [ Element.el [] none
    , Element.el [] none
    , Element.el [] none
    ]
Here's what we can expect:
Note spacing set on a paragraph, will set the pixel spacing between lines.
Set horizontal and vertical padding.
If you find yourself defining unique paddings all the time, you might consider defining
edges =
    { top = 0
    , right = 0
    , bottom = 0
    , left = 0
    }
And then just do
paddingEach { edges | right = 5 }In the majority of cases you'll just need to use spacing, which will work as intended.
However for some layouts, like textColumn, you may want to set a different spacing for the x axis compared to the y axis.
Alignment
Alignment can be used to align an Element within another Element.
Element.el [ centerX, alignTop ] (text "I'm centered and aligned top!")If alignment is set on elements in a layout such as row, then the element will push the other elements in that direction. Here's an example.
Element.row []
    [ Element.el [] Element.none
    , Element.el [ alignLeft ] Element.none
    , Element.el [ centerX ] Element.none
    , Element.el [ alignRight ] Element.none
    ]
will result in a layout like
|-|-| |-| |-|Where there are two elements on the left, one on the right, and one in the center of the space between the elements on the left and right.
Note For text alignment, check out Element.Font!
Transparency
Make an element transparent and have it ignore any mouse or touch events, though it will stil take up space.
A capped value between 0.0 and 1.0, where 0.0 is transparent and 1.0 is fully opaque.
Semantically equivalent to html opacity.
Set the cursor to be a pointing hand when it's hovering over this element.
Adjustment
Angle is given in radians. Here are some conversion functions if you want to use another unit.
Clipping and Scrollbars
Clip the content if it overflows.
Add a scrollbar if the content is larger than the element.
Rendering
Elm UI embeds two StyleSheets, one that is constant, and one that changes dynamically based on styles collected from the elements being rendered.
This option will stop the static/constant stylesheet from rendering.
If you're embedding multiple elm-ui layout elements, you need to guarantee that only one is rendering the static style sheet and that it's above all the others in the DOM tree.
Any hover styles, aka attributes with mouseOver in the name, will be always turned on.
This is useful for when you're targeting a platform that has no mouse, such as mobile.
Disable all mouseOver styles.
Links
link []
    { url = "http://fruits.com"
    , label = text "A link to my favorite fruit provider."
}A link to download a file.
A link to download a file, but you can specify the filename.
Images
Both a source and a description are required for images.
The description is used for people using screen readers.
Leaving the description blank will cause the image to be ignored by assistive technology. This can make sense for images that are purely decorative and add no additional information.
So, take a moment to describe your image as you would to someone who has a harder time seeing.
Color
In order to use attributes like Font.color and Background.color, you'll need to make some colors!
Provide the red, green, and blue channels for the color.
Each channel takes a value between 0 and 1.
Provide the red, green, and blue channels for the color.
Each channel takes a value between 0 and 255.
Create a color from an RGB record.
Deconstruct a Color into its rgb channels.
Nearby Elements
Let's say we want a dropdown menu. Essentially we want to say: put this element below this other element, but don't affect the layout when you do.
Element.row []
    [ Element.el
        [ Element.below (Element.text "I'm below!")
        ]
        (Element.text "I'm normal!")
    ]
This will result in
|- I'm normal! -|
   I'm below
Where "I'm Below" doesn't change the size of Element.row.
This is very useful for things like dropdown menus or tooltips.
This will place an element in front of another.
Note: If you use this on a layout element, it will place the element as fixed to the viewport which can be useful for modals and overlays.
This will place an element between the background and the content of an element.
Temporary Styling
This is a special attribute that counts as both a Attribute context msg and a Decoration context.
Only decorations
Responsiveness
The main technique for responsiveness is to store window size information in your model.
Install the Browser package, and set up a subscription for Browser.Events.onResize.
You'll also need to retrieve the initial window size. You can either use Browser.Dom.getViewport or pass in window.innerWidth and window.innerHeight as flags to your program, which is the preferred way. This requires minor setup on the JS side, but allows you to avoid the state where you don't have window info.
Takes in a Window.Size and returns a device profile which can be used for responsiveness.
If you have more detailed concerns around responsiveness, it probably makes sense to copy this function into your codebase and modify as needed.
Scaling
When designing it's nice to use a modular scale to set spacial rythms.
scaled =
    Element.modular 16 1.25
A modular scale starts with a number, and multiplies it by a ratio a number of times. Then, when setting font sizes you can use:
Font.size (scaled 1) -- results in 16


Font.size (scaled 2) -- 16 * 1.25 results in 20


Font.size (scaled 4) -- 16 * 1.25 ^ (4 - 1) results in 31.25
We can also provide negative numbers to scale below 16px.
Font.size (scaled -1) -- 16 * 1.25 ^ (-1) results in 12.8Mapping
Compatibility
Advanced
Sometimes it's more convenient to just access the whole context while building your view. This functions allow you do just that.
Use the context to build an Element. Have a look at the README for examples.
Use the context to build an Attribute. Have a look at the README for examples.
Use the context to build a Decoration. Have a look at the README for examples.
Use a property from the context to build an
Element. Have a look at the README for examples.