Evg.Advanced
Escape hatches and advanced features for when the high-level API isn't enough.
Most of the time you won't need this module. It's here for the 5% of cases where you need full control over SVG output.
Viewport Control
A viewport is the rectangular area on screen that a drawing gets rendered
into. Normally Evg.svg sets it up for you so that one coordinate unit equals
one pixel. The functions here let you change that relationship: show a
different rectangle of your coordinate system, or control what happens when
the drawing and its on-screen area have different shapes.
Controls what happens when the window's shape doesn't match the drawing's
shape. If the viewBox rectangle is, say, wide and short but the
on-screen area is tall and narrow, something has to give. The choices are:
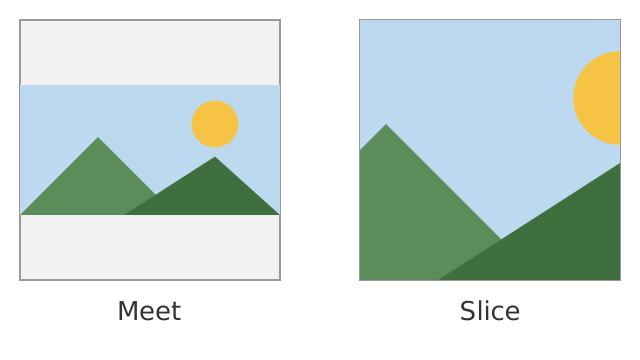
- letterbox it (
Meet): show the whole drawing and leave empty bands - crop it (
Slice): fill the whole area and cut off the overflow - stretch it (
AlignNone): distort the drawing to fit exactly
The AlignValue says where the drawing sits within the
viewport (centred, pushed to the top-left, and so on), and the
MeetOrSlice picks between letterboxing and cropping.
-- The default behaviour: centred and letterboxed.
Advanced.preserveAspectRatio
    Advanced.XMidYMid
Advanced.MeetWhere to place the drawing inside the viewport when
preserveAspectRatio leaves spare room or has to crop.
The names read as two halves: the X part picks horizontal placement (Min
is left, Mid is centre, Max is right) and the Y part picks vertical
placement (Min is top, Mid is centre, Max is bottom). So XMidYMid
centres the drawing both ways, which is the default and usually what you want.
AlignNone is different: instead of positioning the drawing, it stretches it
to fill the viewport exactly, distorting the shapes if the proportions don't
match.
What to do when the drawing's proportions don't match the viewport's.
Meet: scale the drawing until it just fits inside. You see all of it, but there may be empty bands left over on two sides, like the black bars when a widescreen film plays on a square screen.Slice: scale the drawing until it covers the whole viewport. There are no empty bands, but whatever pokes out past the edges gets cropped away.
Escape Hatches
Creates a raw SVG element by tag name. Use this when you need an element that this library doesn't provide a dedicated function for.
Advanced.customElement "foreignObject"
    [ Advanced.customAttribute "x" "10"
    , Advanced.customAttribute "width" "200"
    ]
    []
Any attribute is accepted here, including the ordinary ones from Evg and
its other modules, since the library cannot know what a tag you supply
yourself understands. That also means nothing is checked for you: it is up to
you to only pass attributes the element actually supports.
Advanced.customElement "foreignObject"
    [ Advanced.customAttribute "width" "200"
    , Evg.opacity 0.5
    ]
[]Creates a raw SVG attribute. Use this when you need an attribute that this library doesn't provide a dedicated function for.
Advanced.customAttribute "data-tooltip" "hello"Make your own filter primitive, for filter effects that Evg.Filter
doesn't cover.
You provide a function that receives the identifiers of the input filters (in the same order as the list you pass) and returns a description of the raw filter element to produce:
name: the SVG tag name, such as"feTurbulence"id: a unique identifier for this filter stepargs: attribute name and value pairs for the elementchildren: child elements, each a tag name with its own attribute pairs
Embedding elm/svg
If you already have graphics built with elm/svg,
for example an icon exported from a drawing program, you can drop it straight
into an Evg drawing rather than porting it.
Places graphics built with elm/svg
into an Evg drawing. Useful for icons and other assets exported from a
graphics program, which tools convert to elm/svg mechanically, so you can
use them without porting them by hand.
import Svg
import Svg.Attributes


Evg.svg []
    { width = 100, height = 100 }
    [ Evg.circle [] { r = 40, center = ( 50, 50 ) }
    , Advanced.fromSvg
        { id = "logo"
        , svg =
            Svg.g []
                [ Svg.path
                    [ Svg.Attributes.d "M0 0 L9 9" ]
                    []
                ]
        , fallback = Advanced.notSupported
        }
    ]
The fields:
svgis the graphic to embed.idnames this piece, and must be unique within your drawing. The library cannot look inside anelm/svgvalue, so the name stands in for the content when it needs to tell pieces apart, such as when one is used as a clip stencil. Two pieces sharing a name can be mistaken for each other.fallbackis drawn whenever something is asked of the graphic that the library cannot do to an opaque value. PassnotSupportedto get a visible placeholder,Evg.noneto leave a gap, or draw a real stand-in with Evg if you want the result to look right.
The fallback stands in for the graphic in these cases, so an unsupported combination shows up rather than failing quietly:
Evg.toStringalways uses it, since the embedded markup cannot be read back out of the virtual DOM.- Applying an
Evg.Animatefunction uses it. Animations work by placing an element inside the shape they animate, and the inside of an embedded value is not ours to change.
One limit has no fallback, because the graphic still draws correctly: event handlers on shapes within it report coordinates in the drawing's own space rather than the shape's, since the library does not know what transforms the embedded markup applies.
Attributes still work normally, since those go on a wrapper around the embedded content, so you can position, fade, or clip an embedded graphic:
Evg.group [ Evg.opacity 0.5 ]
    [ Advanced.fromSvg
        { id = "logo"
        , svg = myIcon
        , fallback = Advanced.notSupported
        }
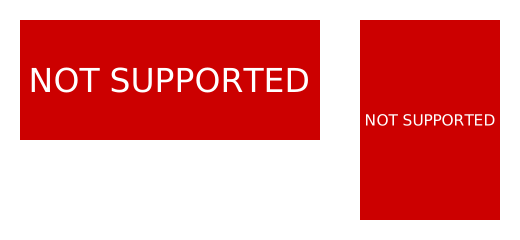
]A visible "not supported" placeholder: a red box with white lettering,
sized to fill whatever area it is placed in. Use it as the fallback for
fromSvg so that anything the library cannot serialize shows up
obviously in an exported file rather than silently leaving a hole.
The red box fills whatever area it is given, whether that is wide, tall, or square, and the lettering stays readable at any of those shapes:
Nested Viewports
Creates a smaller drawing area inside the current one, with its own
coordinate system starting at (0, 0) in its own top-left corner. The record
says where the area sits and how big it is, in the parent's coordinates.
This is useful for embedding a self-contained sub-scene: the children position
themselves relative to the nested area, so you can move the whole thing around
by changing x and y without touching any child coordinates.
Advanced.nestedSvg []
    { x = 50, y = 50, width = 100, height = 100 }
    [ Evg.circle [ Evg.fillStr "red" ]
        { r = 50, center = ( 50, 50 ) }
    ]
A nested area can also carry its own viewBox, which rescales
whatever the children draw to fit the area. That makes it a window onto a
sub-scene: here a drawing that uses coordinates up to 1000 is shown inside a
100 by 100 box, letterboxed if the proportions differ.
Advanced.nestedSvg
    [ Advanced.viewBox 0 0 1000 1000
    , Advanced.preserveAspectRatio
        Advanced.XMidYMid
        Advanced.Meet
    ]
    { x = 50, y = 50, width = 100, height = 100 }
    [ bigSubScene ]
Links
Wraps content in a clickable link.
Advanced.link "https://example.com"
    (Evg.text [ Evg.fillStr "blue" ]
        { x = 10, y = 20, anchor = Evg.Start }
        "Click me"
    )
Accessibility (ARIA)
Sets the ARIA role for assistive technology.
Evg.group [ Advanced.role "img" ] [ ... ]Provides a text label for assistive technology (screen readers).
Evg.group
    [ Advanced.ariaLabel "Sales chart for Q4 2024" ]
[ ... ]Hides an element from assistive technology. Use for purely decorative shapes that add no informational value.
Evg.group [ Advanced.ariaHidden True ]
    [ decorativeShapes ]
Showing and Hiding Elements
Controls whether a shape is drawn. A hidden shape still occupies its place in the drawing, and animations on it keep running, so making it visible again shows it exactly where and how it would have been.
By default a hidden shape does not respond to pointer events. If you need an
invisible shape that still catches clicks, combine this with
Evg.Events.pointerEvents set to Painted or All.
Advanced.visibility Advanced.VisibilityHiddenWhether a shape is visible or hidden.
Sets which rectangle of your coordinate system gets shown. Think of the viewBox as a window onto your drawing: everything inside the rectangle
(minX, minY)to(minX + width, minY + height)is scaled to fill the element's on-screen area, and everything outside it falls out of view.This means you can draw in whatever numbers are convenient (say, data values from 0 to 1000) and let the viewBox map them onto the pixels available. Changing
minXandminYover time pans the window across the drawing, and shrinkingwidthandheightzooms in.