Animator
Getting started
elm-animator is about taking pieces of your model, turning them into Timelines of values, and animate between their states
Create a timeline with an initial state.
So, if you previously had a Bool in your model:
type alias Model = { checked : Bool }


-- created via
{ checked = False }
You could replace that with an Animator.Timeline Bool
type alias Model = { checked : Animator.Timeline Bool }


-- created via
{ checked = Animator.init False }
Reading the timeline
You might be wondering, 'How do we get our value "out" of a Timeline?'
Good question! We can either ask for the current value or the previous one.
Get the current state of the timeline.
Get the previous state on this timeline.
As you'll see in the Loading example, it means we can use previous to refer to data that we've already "deleted" or set to Nothing.
How cool!
Wiring up the animation
Once we have a Timeline, we need a way to update it.
That's the job of the Animator!
An Animator knows how to read and write all the Timelines within your Model.
Here's an animator from the Checkbox.elm example,
animator : Animator.Animator Model
animator =
    Animator.animator
        |> Animator.watching
            -- we tell the animator how
            -- to get the checked timeline using .checked
            .checked
            -- and we tell the animator how
            -- to update that timeline as well
            (\newChecked model ->
                { model | checked = newChecked }
            )
Notice you could add any number of timelines to this animator.
Note — You likely only need one animator for a given project.
Note 2 — Once we have an Animator Model, we have two more steps in order to set things up:
watching will ensure that AnimationFrame is running when the animator is transformed into a subscription.
Note — It will actually make the animation frame subscription run all the time! At some point you'll probably want to optimize when the subscription runs, which means either using watchingWith or Animator.Css.watching.
watchingWith will allow you to have more control over when AnimationFrame runs.
The main thing you need to do here is capture which states are animated when they're resting.
Let's say we have a checkbox that, for whatever reason, we want to say is spinning forever when the value is False.
animator : Animator.Animator Model
animator =
    Animator.animator
        |> Animator.watchingWith .checked
            (\newChecked model ->
                { model | checked = newChecked }
            )
            -- here is where we tell the animator that we still need
            -- AnimationFrame when the timeline has a current value of `False`
            (\checked ->
                checked == False
            )
Note — if you're using Animator.Css to generate keyframes along with Animator.Css.watching, you don't need to worry about this.
Convert an Animator to a subscription.
This is where the animator will decide if a running animation needs another frame or not.
subscriptions model =
Animator.toSubscription Tick model animatorWhen new messages come in, we then need to update our model. This looks something like this:
type Msg
    = Tick Time.Posix


update msg model =
    case msg of
        Tick newTime ->
            ( Animator.update newTime animator model
            , Cmd.none
            )
And voilà, we can begin animating!
Note — To animate more things, all you need to do is add a new with to your Animator.
Transitioning to a new state
Now that we have a Timeline set up, we likely want to set a new value.
In order to do that we need to specify both —
- the new state we want to be in
- a
Durationfor how long this transition should take.
Go to a new state!
You'll need to specify a Duration as well. Try starting with Animator.quickly and adjust up or down as necessary.
Choosing a nice duration can depend on:
- The size of the thing moving
- The type of movement
- The distance it's traveling.
So, start with a nice default and adjust it as you start to understand your specific needs.
Note — Here's a very good overview on animation durations and speeds.
0ms
100ms.
200ms - Likely a good place to start!
400ms.
500ms.
Interruptions and Queueing
In some more advanced cases you might want to define a series of states to animate through instead of just going to one directly.
Animator.interrupt
    [ Animator.wait (Animator.millis 300)


    -- after waiting 300 milliseconds,
    -- start transitioning to a new state, Griffyndor
    -- Take 1 whole second to make the transition
    , Animator.event (Animator.seconds 1) Griffyndor


    -- Once we've arrived at Griffyndor,
    -- immediately start transitioning to Slytherin
    -- and take half a second to make the transition
    , Animator.event (Animator.seconds 0.5) Slytherin
]Interrupt what's currently happening with a new list.
Wait until the current timeline is finished and then continue with these new steps.
Animating
Finally, animating!
This part of the package is for animating color and number values directly.
However! You're probably more interested in animating CSS or Inline styles.
Those things live in the Animator.Cssand Animator.Inline modules.
Check them out on the side bar 👉
Though you should also check out the 👇 Transition Personality section as well.
Interpolate linearly between destinations. This is a shortcut to help you out.
You can do this with move by doing
Animator.move timeline <|
    \state ->
        if state then
            Animator.at 0
                |> Animator.leaveSmoothly 0
                |> Animator.arriveSmoothly 0


        else
            Animator.at 1
                |> Animator.leaveSmoothly 0
                |> Animator.arriveSmoothly 0
Which is equivalent to
Animator.linear timeline <|
    \state ->
        if state then
            Animator.at 0


        else
            Animator.at 1
Transition personality
While there are some nice defaults baked in, sometimes you might want to adjust how an animation happens.
These adjustments talk about arriving or leaving. That's referring to the part of the animation that is arriving to or departing from a certain state.
So, for this code example:
 case state of
    True ->
        Animator.at 0
            |> Animator.leaveLate 0.2


    False ->
       Animator.at 50
If we're at a state of True and go to any other state, we're going to leave True a little later than the normal time.
Note — These adjustments all take a Float between 0 and 1. Behind the scenes they will be clamped at those values.
Even though the transition officially starts at a certain time on the timeline, we can leave a little late.
0means we leave at the normal time.0.2means we'll leave when the transition is at 20%.1means we leave at the end of the transition and instantly flip to the new state at that time.
We can also arrive early to this state.
0means we arrive at the normal time.0.2means we'll arrive early by 20% of the total duration.1means we arrive at the start of the transition. So basically we instantly transition over.
Weird math note — arriveEarly and leaveLate will collaborate to figure out how the transition happens. If arriveEarly and leaveLate sum up to more 1 for a transition, then their sum will be the new maximum. Likely you don't need to worry about this :D.
The intended use for arriveEarly and leaveLate is for staggering items in a list. In those cases, these values are pretty small ~0.1.
Underneath the hood this library uses Bézier curves to model motion.
Because of this you can adjust the "smoothness" of the curve that's ultimately used.
leaveSmoothly 0is essentially linear animation.leaveSmoothly 1means the animation will start slowly and smoothly begin to accelerate.
Here's a general diagram of what's going on:
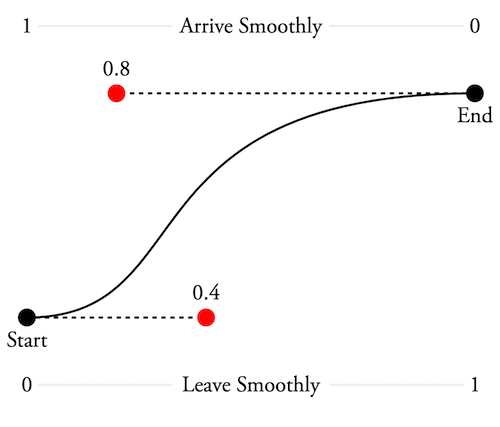
Note — The values in the above diagram are the built in defaults for most movements in elm-animator. They come from Material Design.
Note 2 — An interactive version of the above diagram is also available.
We can also smooth out our arrival.
arriveSmoothly 0means no smoothing, which means more of a linear animation.arriveSmoothly 1means the animation will "ease out" or "arrive slowly".
This will make the transition use a spring instead of bezier curves!
withWobble 0- absolutely no wobblewithWobble 1- all the wobble
Use your wobble responsibly.
Resting at a state
We've mostly talked about transitioning from one state to another, like moving from True to False.
But what if we want an animation when we're just resting at a state?
An obvious example would be an icon that spins when we're Loading.
Well, in that case you can use an Oscillator.
case state of
    Loaded ->
        Animator.at 0


    Loading ->
        -- animate from 0 to 360 and
        -- then wrap back around to 0
        Animator.wrap 0 360
            -- loop every 700ms
|> Animator.loop (Animator.millis 700)This is basically a sine wave! It will "wave" between the two numbers you give it.
Start at one number and move linearly to another, then immediately start again at the first.
This was originally intended for animating rotation where you'd want 360deg to "wrap" to 0deg.
Start at one number, move linearly to another, and then linearly back.
Or make whatever kind of oscillator you need!
This takes a function which is given the progress of this oscillation as a Float between 0 and 1.
Once we've created an oscillator, we need to specify how long it should take and how many times it should repeat.
Shift an oscillator over by a certain amount.
It's expecting a number between 0 and 1.
Sprites
Ok! What else could there be?
What about the wonderful world of Sprite animation?
Sprite animation is where we literally have a list of images and flip through them like a flip-book.
Like Mario! In fact we have a Mario example!
Here's an abreviated example of what the code looks like:
Animator.step model.mario <|
    \(Mario action) ->
        case action of
            Walking ->
                -- if we're in a `Walking` state,
                -- then we're cycling through
                -- the following frames at
                -- 15 frames per second:
                --  step1, step2, stand
                Animator.framesWith
                    { transition =
                        sprite.tail.stand
                    , resting =
                        Animator.cycle
                            (Animator.fps 15)
                            [ sprite.tail.step1
                            , sprite.tail.step2
                            , sprite.tail.stand
                            ]
                    }


            Jumping ->
                -- show a single frame
                sprite.tail.jump


            Ducking ->
                sprite.tail.duck


            Standing ->
sprite.tail.standShow a single sprite.
Walk through a list of frames as we're transitioning to this state.
Here we have the same distinction of transition and resting that the rest of the library has.
With framesWith we can define the frames it takes to transition to this state, as well as what to do when we're in this state (maybe we want to loop through a number of frames when we're in this state).
While we're at this specific state, cycle through a list of frames at this fps.
Same as cycle, but only for n number of times.
A timeline of
statevalues.Behind the scenes this is roughly a list of states and the times that they should occur!