Evg.Text
Advanced text layout for when the basic Evg.text isn't enough.
Use this module when you need:
Mixed styling within a single line of text, such as one bold red word in an otherwise plain sentence
Text that bends to follow a curved line instead of sitting on a straight one
Fine control over spacing, boldness, decoration, and how the text sits relative to the point you place it at
Here is a sentence where just one word is red and bold:
import Evg
import Evg.Text as Text


Text.richText [ Evg.fontSize 16 ]
    { x = 10, y = 50, anchor = Evg.Start }
    [ Text.tspan [ Evg.fillStr "black" ] "Hello, "
    , Text.tspan
        [ Evg.fillStr "red"
        , Text.fontWeight Text.Bold
        ]
        "world"
    , Text.tspan [ Evg.fillStr "black" ] "!"
    ]
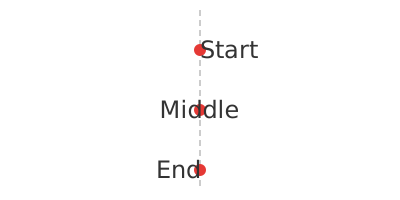
A note on positioning: text is placed at a single point. The anchor field
decides where the text sits relative to that point horizontally (Start
puts the point at the left edge of the text, Middle centers the text on
it, End puts the point at the right edge), and by default the point sits
on the baseline, the invisible line the letters rest on. dominantBaseline
lets you change that vertical relationship.
Rich Text
Creates a styled run of text. Use within richText to give different
parts of the same line their own color, size, weight, or font. The runs
flow one after another as a single piece of text.
Text.tspan [ Evg.fillStr "red", Evg.fontSize 24 ]
    "important"
This produces the word "important" in large red letters wherever it falls within the surrounding text.
Renders several styled runs of text as one continuous line. Each run can have its own color, size, and font, but they flow together as a single piece of text.
The position works like Evg.text: the text is placed at the point
( x, y ), with anchor deciding whether that point is at the left edge
of the text (Start), its center (Middle), or its right edge (End).
The point sits on the baseline, so the letters rest on top of the y
coordinate you give.
Text.richText [ Evg.fontSize 16 ]
    { x = 10, y = 30, anchor = Evg.Start }
    [ Text.tspan [ Evg.fillStr "black" ] "Normal "
    , Text.tspan [ Evg.fillStr "blue" ] "blue "
    , Text.tspan [ Evg.fillStr "black" ] "normal"
    ]
This shows one line of text starting at (10, 30) with only its middle word in blue.
Text on a Path
Makes text bend to follow a path instead of running in a straight line.
Apply this attribute to Evg.text or Text.richText and each letter is
placed and rotated so the whole line of text traces the path's shape, the
way lettering follows the curve of a round badge or a wavy banner.
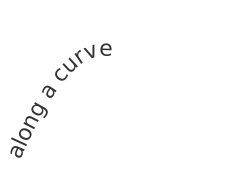
import Evg.Path exposing (Path(..), PathSegment(..))


Evg.text
    [ Evg.fillStr "black"
    , Text.onPath
        [ M ( 10, 80 )
            [ C ( 40, 10 ) ( 65, 10 ) ( 95, 80 ) ]
        ]
    ]
    { x = 0, y = 0, anchor = Evg.Start }
    "Text along a curve"
This draws the sentence climbing up and over an arch. The path itself stays invisible; only the text shows. Text that is longer than the path gets cut off at the path's end.
Text Attributes
Forces text to occupy exactly the given width, stretching or squeezing it as needed. Useful when text must line up with something of a fixed size, such as filling the full width of a button or column regardless of how many letters it contains. The second argument controls whether only the gaps between letters change or the letters themselves deform too.
Text.textLength 200 Text.SpacingAndGlyphsThis makes the text exactly 200 units wide, stretching both the letters and the spaces between them.
How text is stretched or squeezed when textLength forces it to a
specific width.
Spacingonly changes the gaps between letters; the letters keep their shape, so this looks better for small adjustmentsSpacingAndGlyphsstretches the letters themselves as well as the gaps, which distorts the letterforms but distributes big changes more evenly
Controls where text sits vertically relative to the y coordinate you
give it. By default the letters rest on top of that coordinate, like words
sitting on a ruled line. This attribute moves that line.
Autois the default: letters rest on top ofy, with descenders like the tail of "g" dipping belowMiddlecenters the text vertically ony, which is usually what you want when labeling a point or centering text in a boxHanginghangs the text belowy, soymarks roughly the top of the lettersCentralalso centers ony, but measures from the font's overall height rather than the lowercase letters, so it can sit slightly differently thanMiddleTextTopputs the very top of the font's tallest letters atyTextBottomputs the very bottom of the font's deepest descenders aty
For example:
Text.dominantBaseline Text.HangingThis makes the text hang below the point you give instead of sitting on it.
Where text sits vertically relative to the y coordinate you place it
at. See dominantBaseline for what each option looks like.
Draws a decorative line on the text: underneath it, above it, or striking through it.
Text.textDecoration Text.UnderlineThis underlines the text.
Lines drawn through or alongside text.
Underlinedraws a line under the textOverlinedraws a line above the textLineThroughstrikes the text out with a line through its middleNoDecorationremoves any of the above
Adjusts the space between individual letters. Positive values spread the letters apart, negative values squeeze them closer together.
Text.letterSpacing 2This adds 2 units of extra space between every pair of letters, giving the text an airy, spaced-out look.
Adjusts the space between words, leaving the letters within each word untouched. Positive values push the words apart, negative values pull them together.
Text.wordSpacing 5This adds 5 units of extra space at every gap between words.
Controls whether text is written horizontally or vertically.
Text.writingMode Text.VerticalRLThis makes the text run from top to bottom, as in traditional Japanese layout.
The direction lines of text run.
HorizontalTBis ordinary horizontal text, with lines stacking top to bottomVerticalRLruns text top to bottom, with successive lines stacking right to left, as in traditional Japanese layoutVerticalLRruns text top to bottom, with successive lines stacking left to right
Nudges text sideways from where it would otherwise be drawn. Positive
values move it right, negative values move it left. Handy for fine-tuning a
label's position without recomputing its x coordinate, or for offsetting
one span inside richText.
Text.dx 5This shifts the text 5 units to the right.
Nudges text up or down from where it would otherwise be drawn. Positive
values move it down, negative values move it up. A common trick is to use
this on spans inside richText to create superscripts and subscripts.
Text.dy 10This shifts the text 10 units down.
Controls how bold the text looks.
Text.fontWeight Text.Bold


Text.fontWeight (Text.Weight 600)
The second example produces a semi-bold weight, between normal and bold.
How thick the strokes of the letters are.
Normalis regular textBoldis heavy textBolderis one step heavier than the surrounding textLighteris one step lighter than the surrounding textWeight npicks an exact weight on the usual 100 to 900 scale, where 400 is normal and 700 is bold (the font must provide that weight for it to show)
Controls whether the text is upright or slanted.
Text.fontStyle Text.ItalicThis renders the text in slanted italic letters.
Whether the letters are upright or slanted.
StyleNormalis upright textItalicuses the font's italic letterforms, which are usually slanted and often more cursiveObliquesimply slants the normal letterforms without changing their shapes
A run of text with its own styling, to be laid out as part of a
richTextblock. Create these withtspan.